Beef AF: Smashburger Cooking Basics


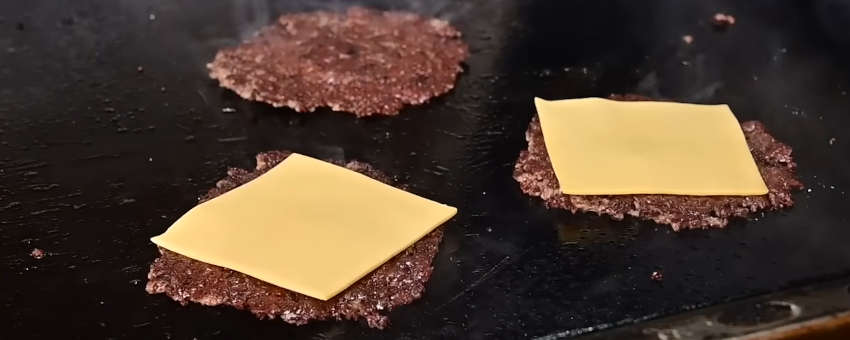
My home kitchen is modestly equipped, but oh, what delicious smash burgers I have been able to prepare! You can do it too!. Having cooked dozens of smash burgers on both cast-iron skillets and outdoor flat-top griddles, I can tell you that while the process is straightforward, the details make all the difference. Like traditional thick tavern burgers that cook slowly over medium heat, a proper smash burger also cooks best over medium heat. However, you will smash the meat under high pressure and the cooking time is fast. It does not take long to get a lacy, caramelized crust.
Here is a step-by-step guide from one home burger enthusiast to another.
Step 1: Choosing the Beef (Fat & Portioning)
The secret to a great smash burger is the fat ratio—it renders out on the hot metal surface and essentially fries the beef in its own juices.
- Fat Ratio: 80/20 ground chuck is the gold standard workhorse. If you want an even richer crust, a 75/25 or 70/30 blend works wonderfully. Avoid lean blends like 90/10; without enough fat rendering, the meat won’t brown properly via the Maillard reaction and will end up dry and gray.
- Portion Size: Keep your portions between 2.5 oz and 4 oz per patty. If you like a classic double cheeseburger, 2.5 to 3 oz balls are ideal. For an easy rule of thumb, form your ground beef into balls about 1 1/2 times the size of a golf ball, or use a small ice cream scoop to size them.
- Handling: Roll the cold meat into loose balls. Do not over-pack or tightly compress the meat in your hands; or you could end up with burgers which do not smash well and cook tough. Keeping the structure loose allows the patty to smash thin easily and yield a tender, crispy edge.
Step 2: Selecting and Prepping the Buns
Because smash patties cook so fast, your buns need to be prepped and ready before the meat hits the heat.
- Potato Rolls: Soft potato buns (like Martin’s) are widely considered the top choice. They are squishy, hold up well to grease, and mold around the hot patties.
- Brioche Buns: Brioche offers a rich, buttery sheen and a polished look, though some cooks find them a bit too sweet or dense compared to potato rolls.
- Toasting Tip: Spread a thin layer of mayonnaise on the cut sides of the bun instead of butter before griddling. Mayo spreads evenly and creates a uniform, deep golden toasted crust.
Step 3: Picking the Cheese
- American Cheese: This is the undisputed champion for smash burgers. Thanks to emulsifying salts, sliced American cheese melts instantly without breaking or separating into grease.
- Cheddar, Pepper Jack, or Provolone: Sharp cheddar, provolone, or Monterey/Pepper Jack add great flavor. However, because they melt more slowly than American cheese, you’ll want to place a metal melting dome (or pot lid) over the patty for a few seconds to capture steam and speed up the melt.
Step 4: Onions (Optional) for Classic Oklahoma Onion Burger Style
If you want to make Oklahoma onion burgers, you will use sweet yellow or white onions, sliced as thinly as possible, like paper. Avoid red onions, unless you really, REALLY want them. The red onions have sugars which caramelize fast and tend to burn quickly. Onion burgers should use a 50/50 ratio of meat to onions. Note that the onions give up moisture and shrink as they cook, so you end up with a burger only 1/4 to 1/3 larger than one without onions. Put the onions on the burger just after it hits the surface, before doing the smash. Just set that ball of meat down, cover it generously with onions, then smash them down, flat, under high pressure.
- Slice Thin as Paper: You should use a deli slicer or mandolin, if available. Otherwise, just do it manually, with a sharp knife.
- 50/50 Meat-to-onion Ratio: The onions shrink away as they cook, so use as much onion as meat.
- Apply Before Smashing: Just after putting the burger meat onto the pan or griddle, put the onion on top, before smashing.
- Smash Together: When you do the smash, press the onions down into the meat.
- Let them Cook: After the smash, just let the meat and onions cook. Wait for them to caramelize and sear.
Step 5: The Cook — Heat, Speed, and Smashing Technique
This is the most critical stage. Smash burgers cook in about 2 to 3 minutes total, compared to the 8–10 minutes required for thick burgers. Remember to prepare your buns first; they need to be ready to use very soon.
- Moderately Hot Cooking Surface: Pre-heat a heavy cast-iron skillet, carbon steel pan, or flat-top griddle until it is moderately hot (350°F, 177 °C). Avoid adding cooking oil to the pan; you want the cold meat to contact dry, hot metal so it sticks slightly and creates maximum surface browning. In a worst case scenario of a badly seasoned iron surface, you could get away with applying a light coating of butter beef tallow.
- Place the Meat: Place 1 or 2 chilled meat balls onto the hot griddle.
- Place the Onions (if used): Place a handful of thinly sliced onions over the ball of meat. Adjust the onions as needed, so that they will be smashed into the meat.
- Smash: Place a small square of parchment paper over the ball (to prevent sticking) and press down hard with a heavy metal press or stiff spatula. Apply firm, even pressure straight down for 10 full seconds, extending the edges out as thin and lacy as possible.
- The Golden Rule: Smash when the meat is cold and first hits the pan. Do not smash a patty after it has started browning or after flipping, or you will squeeze out all the rendered internal juices.
- Season the Patty: Season the top side with kosher salt and pepper immediately after smashing.
- Watch the Sear & Flip Fast (60–90 Seconds): Because these patties are paper-thin, you’ll see juices bubble up through the top and the edges turn dark and crispy within 60 to 90 seconds.
- Aggressive Scraping: Using a sharp, stiff metal spatula angled low against the pan, scrape forcefully underneath the patty to lift the entire caramelized crust off the metal without tearing it.
- Finish & Steam: Flip the patty, then lay down your cheese, and stack the toasted top bun directly over the cheese, with the bottom bun resting on top of that. The rising steam from the searing meat and melting cheese warms and softens the bun.
- Assemble: After just 30 to 45 seconds on the second side, slide your spatula under the patty and stack it onto your bottom bun.
Summary Checklist for Success
- Beef: 80/20 or 75/25 ground chuck.
- Portion: 2.5–3 oz loose balls for doubles.
- Heat: Moderately hot cast iron or griddle (350°F, 177 °C).
- Onions: If making onion burgers, put the onions on top of the meat immediately before the smash.
- Timing: Smash immediately for 10s; cook ~60–90s on side one, flip, cheese, and remove after ~30s on side two.
© 2026 Beef AF, All Rights Reserved.
Written and curated by Chef William Jackson
Contact, Privacy Policy and Disclosures, XML Sitemap.